How to design parabolic, hyperbolic, elliptical reflectors for 3D printing


Designing parabolic reflectors for 3D printing
In this article, we show you how you can design parabolic reflectors from first principles with any CAD software. Here at Stratnel, we offer design advisory and printing services and enable designers to use additive manufacturing to move quickly and get more done.
Applications
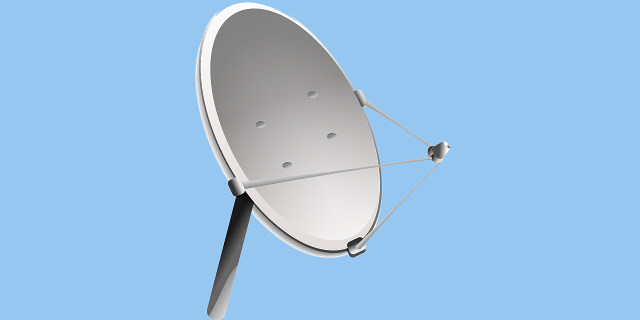
Reflectors are used in applications like industrial lighting, stage spotlights, home lighting, signal collection in antennas, directional microphones, speaker enclosures, infrared heaters, ultrasound sensors, etc.
The common geometrical shapes used are spherical, ellipsoidal, paraboloidal and hyperboloidal. These shapes are simple conic sections. Reflectors use any of these shapes or sometimes a combination of these shapes to increase the effectiveness of signal collection and transmission.
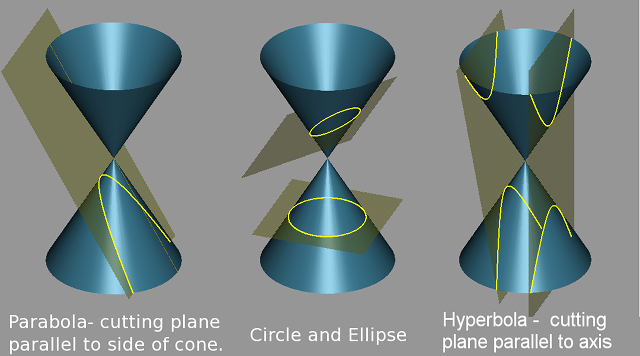
Source: Wikipedia, modified by Stratnel.
All of them have different characteristics. These geometrical shapes can be used appropriately to increase the effectiveness of the design. For instance a parabolic reflector will generate parallel beams when the source is in the focal point. We will discuss designing parabolic reflectors/collectors and 3D printing them. Any conical section shape can be designed and 3Dprinted with additional features, using similar principles.
From equations to CAD
Modeling in Autodesk Fusion 360
Image © Stratnel Technologies LLP
Here is a way to model in Autodesk Fusion 360 from first principles.
Andrew Sears from Autodesk support mentioned this method in the Fusion360 user forum. I have explained the steps involved in more detail.
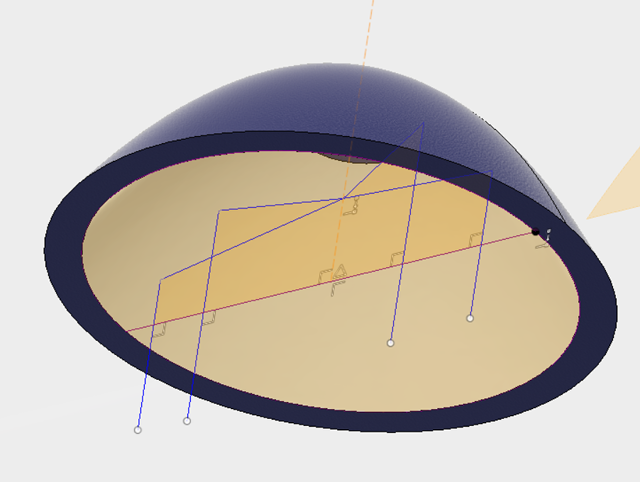
The design steps in Autodesk Fusion 360 are based on the space available. We may start with some basic parameters like the diameter D and height h. Let us consider D=80 and h=30.
Step 1
Construct a triangle with Base=D=80 and height=2h=60.
Draw a line from the mid point of base which is perpendicular to the hypotenuse. Let us call this offset distance and measure it. In this case it happens to be distance=33.282.

Image © Stratnel Technologies LLP
Step 2
Revolve the area enclosed by hypotenuse, base and axis around the axis line to generate a conical body.
Generate a tangent plane and copy (or move) it by the offset distance (33.282) so that it will pass through the intersection of offset distance line and the base line and split the body.
Step 3
The splitting plane has the parabola we need. We now copy the parabolic curve and offset the curve outside for required thickness ( say 3 mm) and revolve the section to get the parabolic reflector we started with.


Images © Stratnel Technologies LLP
From CAD to prototype
3D printing is a great way to get from design validation, through functional testing, and manufacturing small batches.
You may also consider aesthetics, ease of printing, mounting arrangements etc. as you iterate with your 3D printing service provider. Here is an example of a parabolic reflector with integrated mounting fixture.

Image © Stratnel Technologies LLP
K. Padmanabhan
CEO & Founder. Mechanical engineer with PG in Tool Design and Manufacturing; Varied experience in global companies; CEO of MNC for over 17 years; Strong process background.
“Great Blogpost! Thanks for one’s marvelous posting! I _genuinely enjoyed”
My brother recommended I might like this blog. He was entirely right. This post truly made my day. You cann’t imagine just how much time I had spent for this info! Thanks!